

Solution for farmers, Household
Are you interested in cooking replacing firewood by bio-gas?
Family low-cost biodigesters

A biodigester is a natural system that uses anaerobic digestion (in the absence of oxygen) of bacteria that already live in the manure, to transform them into biogas and fertilizer. Biogas, mainly methane, can be used as fuel for cooking, heating or lighting (direct combustion) and engine power to generate electricity.
The fertilizer, called biol, can be used as natural fertilizer that strongly improves crop yields.
Case study: design of a digester for three hours daily cooking.
A small family in the highlands of Bolivia, which has a yoke of oxen, cooks with wood about two hours a day and want to replace firewood with biogas (3h). Considering consumption of 140 liters an hour, three hours represent 420 liters of biogas a day.
According to a table of production of biogas manure of livestock species, in cattle is necessary to divide the liters of biogas by the ratio 35.3 to see the manure needed. In this example: 420 l biogas / 35.3 = 12 kg of fresh manure daily.

Next step is mixing manure with water at a ratio of 1 (manure) to 3 (water) in cattle. So every day mix 12 kg of manure with 36 liters of water, giving a daily load of 48 liters a biodigester.
Being in a cold climate of the plateau, the retention time will be over about 60 days. The liquid volume is obtained by multiplying the retention time (60 days) by daily load (48 l) = 2880 liters.
The liquid volume 2.880 m3 will involve three-quarters of the total volume and a quarter will be for the gas. To the biogas it is assigned a third of the liquid volume (2880 / 3 = 960 liters). The total volume of the biodigester will be 2880 + 960 = 3.840 m3.
Biodigester dimensions will depend on the widths of tubular polyethylene roll available on the market. The optimum ratio of diameter / length of the cylinder of the biodigester is a ratio of 1:7. That is, the length is about 7 times the diameter. Continuing with the example of 3,840 m3, if we have a roll of 1.50m wide, we will have a diameter of 0.96 m and a length of 5.4 m.
Finally, you just have to ditch that will contain the polyethylene biodigester with these measures: Lower widths=0.50m / Width top=0.70m / Height=0.80m and Length=5.40m.
Do you know cases of biodigesters for cooking? Find out the advantages, disadvantages and dangers? Your opinion matters to us all. We can learn from your experience!! Thanks
BIODIGESTORES FAMILIARES. Jaime Martín.
Video construccion biodigestor
Related posts: Biogas Kitchen. DIY your Low Cost Biodigester (II)
Biogas Kitchens. Low Cost Biodigesters (I)
Related articles
- Biogas Kitchens. Low Cost Biodigesters (I) (albertcampi.me)
- Biogas Kitchen. DIY your Low Cost Biodigester (II) (albertcampi.me)
Biogas Kitchen. DIY your Low Cost Biodigester (II)
Construction of a biodigester
In the previous post (I) I explained the strenghts of a biodigester for a small kitchen. In this post I will try to summarize the steps to construct one, from Jaime Marti PDF, “Biodigestores familiares.”

1 .- Double layer plastic
Cut the black tubular polyethylene rolls of desired size, leaving 50 cm extra on both ends (input and output). Extend completely the plastic sleeve above the ground. One person holds the end and, without releasing it, crosses inside the digester, so that there is only one double-layer sleeve, since it is a tubular roll, seamless.

2 .- Biogas output from biodigester
In the upper half of the biodigester make a small cut on the two layers of plastic and put a bulkhead (flange) as shown in the photos. Take good care of the complete sealed to prevent outside air from the biodigester.

3 .- Inlet and outlet sludge pipes
Once the biogas output is ready, it is time to close the ends of the plastic sleeve tied to the inlet and outlet pipes. Make accordion folds and tied tightly with pneumatic league.

4 .- Introduction into the ditch
Place the plastic biodigester in the trench previously prepared, very careful to not cause any hole and reviewing not have wrinkles.

 5 .- Mud level

You have to calculate the mixture of manure and water has to clog the air intake and also their escape. The biogas generated has to exit strictly through the upper pipe. The sludge has to overflow through the outlet pipe.

 6 .- Biogas pipeline

The digester has already prepared the output of the biogas. Couple an outer pipe 1 / 2 “PVC to the kitchen, which should be about 20 to 50 meters maximum away.
7 .- Water accumulation inside pipes
The pipe will be high, never buried, to facilitate water drain condensation that may occur. In the “valleys” of the pipe place a “T” plug for periodically purge.

 8 .- Safety valve

The safety valve near the digester has two functions: Allow the escape of excess of not consumed biogas as well as Prevent air inlet from outside (which would kill the internal process of generation of biogas). A plastic bottle with water is sufficient.
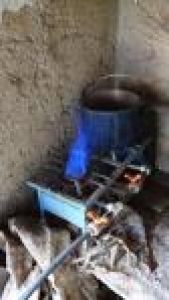
9 .- Gas reservoir
The reservoir will be the biogas storage tank that feeds the kitchen and regulates the pressure of the gas. It must be hung near the kitchen, accessible, preferably outside but under cover of sun, rain and wind. It is built with the same procedure of the biodigester.

10 .- Biogas kitchen
The reservoir will have a pipe with stopcocks highly visible and directly to the burners, that can be housed with mud and adobe. That’s all!

What’s your positive or negative experience? Your comments are very welcome!!